Editing an Invoice in WP Invoice plugin
WP-Invoice was developed keeping both the user’s and his clients’ needs in mind. Our main target was designing the plugin to be both functional and easy to use. For this reason, we built it so it uses the native WordPress post system. In other words, every invoice is a custom-made WordPress post, like the posts and pages you are already familiar with. The first thing you see when you create a new invoice is a page, similar to the native WordPress Post and Page edit page. We will explain the process of editing the invoice by breaking the interface into sections:
Invoice Description and Content
These two fields are the heart of any WordPress post type and an important part of our invoice.
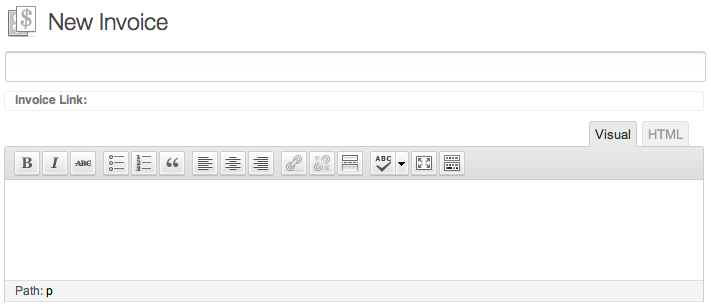
- The Invoice Description (or title) is the text you use to name that particular invoice. It can be anything from a quick description of the sum of your invoice’s items (e.g. “Web Design and Development Services”), a title to link it to a particular client or project (“Invoice for myAwesomeSite.com”) or your dog’s name (“Foofie”). Okay, that last one may not be so practical. Remember that you can use the title of the invoice instead of the Invoice Display Page’s title (set under the Business Process tab in WP-Invoice settings).
Tip: It is suggested that you use the first example to sum up the services. Remember that you can use any invoice as a template for new invoices, that will make things faster and easier for you if you have clients that buy more or less the same services, or if you have some kind of package deal, that you usually offer to clients (with discounts or not).
- The Invoice Content is a free text you can write for your invoice. This will appear on the invoice display page and PDF invoice. You really don’t need to write something here if you don’t want, it is suggested that you use it though.
Here’s that area filled in:

Now we are ready to add our line items. We can either create new line items or use predefined (default) line items that we have created in the Predefined Line Items tab of the WP-Invoice settings screen. To learn how to create Predefined Line Items please visit the Predefined Line Items settings page on our documentation.
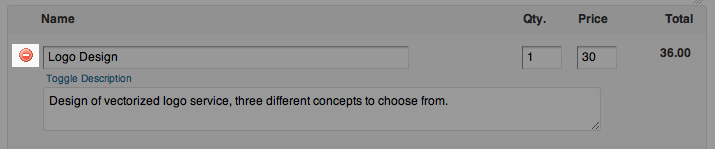
Adding Invoice Line Items
This metabox is the most important part of your invoice. It allows you to add items (services or products) to your invoice. You generally want to fill these in, that’s how you get paid afterwards.

The fields here are the following:
Name: This is the name of the product or service your client will see on the invoice. Keep it short and easy to understand. For our Web Professional example, this could be “Web Design,” “Web Development”, or even more specific like “WordPress Plugin Development”, “PHP Development”, “PSD Slicing”, “Content Creation” etc.
Description: This field is originally hidden and can be toggled with the “toggle description” link, underneath the Name field.A small paragraph giving more detail about the nature of the product or service. Especially helpful to Web Professionals who like to break up every invoice into different services that the client would never understand on his own. For example, the description for “PSD Slicing” could be “Creation of HTML / CSS code for static Photoshop web design”. Be creative but short.
Qty: The quantity of the product or service your client will be paying for. Obviously this will vary from invoice to invoice, but for the model item you could use a minimum or average quantity. For services that are charged by the hour, this field would be the number of hours charged. The quantity could mean anything from items, hours, pounds, kilograms, liters or whatever unit of measure, but make sure that if you are not sticking to the traditional items or hours, your client will know what this number means. A good suggestion would be to add a “charged by the hour / liter / pound” in the end of the description field.
Price: The unit price for the product or service. Multiplied by the quantity, it gives us the total for the model entry. To make it even more obvious, this is how much one item, hour of work, pound of X or liter of Y costs.
Tax: The tax for the particular product / service. Unfortunate but helps the economy.
Total: This is actually not a field but a dynamic label, the number in which, changes depending on the quantity, price and tax you have set.
Adding discounts
To add a discount to our invoice, we click on the “Add Discount” button on the bottom of the area.

Instantly, a special kind of line appears under the last line item we have entered. What we have here are two fields and a discount type selector drop-down.

The fields here are the following:
- Name: The name of your discount. A short text that should explain what that discount is for or just state that there is a discount. Examples: “Returning customer discount”, “Awesome client discount”, “Discount” (boring).
- Discount type: WP-Invoice gives us the option to either set an Amount Discount, or a Percent Discount.
- Price: Here we set the price of the discount, whether it is percentile or fixed. We don’t have to enter the % sign for the Percent Discount, just the number.
WP-Invoice automatically calculates the tax, depending on the tax settings (before or after discount, described under “Tax Handling” on the Main Settings tab documentation) and updates the relevant information display. Here are the fields completed and the tax calculated:

Deleting Line Items
To delete a line item just click on the red icon on the left of the title field. Poof! Gone.
Using Predefined Line Items
If we have created Predefined Line Items via the WP-Invoice Settings Predefined Line Items tab and we want to use them in our invoice, we can select them from the Invoice Line Items area. These items will appear normally on the list and you can still edit their name, description, quantity and price. To add a predefined line item to our invoice we click on the “Insert a predefined line item” drop-down, which is located between the “Add Line” and “Add Discount” buttons.

Note: The “Insert a predefined line item” drop-down will only appear if we have set predefined line items.
What we see next is a list of all the predefined line items we have set, as follows:

Now we just have to click on the predefined line item of our choice and if we want more than one, repeat. The items will appear normally on our list, ready to be edited:

Payment Settings
Underneath the Line Items section, there is the Payment Settings section, where you can set the default payment method and other payment options for this particular invoice. The default options here will depend on the ones we have set on the Payments tab under WP-Invoice settings. As every client is different and needs to be treated specially though, you can still change these settings for the invoice you’re working on. Here is the Payment Settings area:

Here we see the following fields:
- Default Payment Option: This drop-down sets the default payment method for the invoice. The default payment method that appears is the one we have set on the Payment settings tab. We can change that for our invoice to whatever method we wish to use, as long as we have enabled it first.
- Client can change payment method: This checkbox enables the Accepted Payment area that you see on the screenshot above. If checked, we can give our client more payment options, selectable on the Accepted Payments area.
- Toggle Advanced Payment Options: By clicking this, the payment gateway settings fields that we can find in the payment settings tab will appear here as well to change at will. Note that the default settings will not change. A field to change the currency for this invoice will appear too.

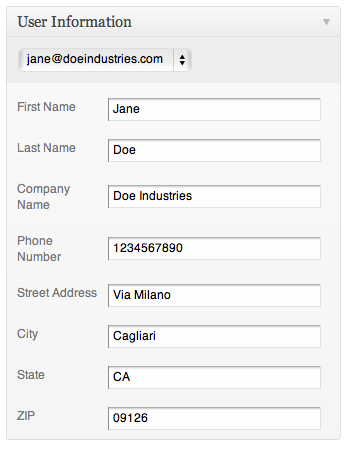
Adding Client Information
On the right sidebar of the edit invoice window you will notice a metabox with the client information. If the client you are invoicing did not exist (you have not invoiced him or he doesn’t exist in the WP-CRM system, the fields in that metabox will be empty:

If it’s empty, what we should do is to enter our client’s information. The information set here will appear on the PDF version of the invoice. When we’re done we should have something like this:
Saving the Invoice
On the top right of the invoice edit page you will see the Publish metabox. Before you save the invoice it will look like this:
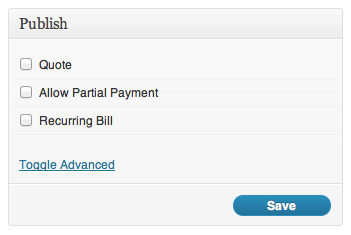
Here we can see the following options:
-
Quote: If checked, this entry will be saved as a quote and not as an invoice. This will enable the discussion feature for the quote and disable payment until the client has accepted the quote price and you have edited the quote and saved it as an invoice (by unchecking the field and saving it again). This field only appears if you have the Quotes free add-on.
- Allow Partial Payment: If checked, a field will appear, letting you set the minimum payment for this invoice, and the client will not be forced to pay the full price of the invoice.
-
Recurring Bill: If checked, three new fields will appear for us to set the recurring billing options:
- Bill Every X Y: Here we enter a number (X) in the input field and choose a timeframe (Y - Days or Months) from the drop-down menu so we can set the interval between billings.
- Billing Cycles: A number that sets how many times our client will be billed.
-
Send invoice: If “automatically” is checked, the client will be sent the invoice automatically when it’s time to be billed again. If not, you will have to do it manually.
-
Toggle Advanced: This link toggles some extra options for our invoice:
- Invoice ID: WP-Invoice sets an ID number for the invoice. If we want to use a custom ID for the invoice, we must click on the “Custom Invoice ID” on the right of the ID number, which will turn into a field that we can use to enter an ID of our choice.
- Global Tax: This sets the tax for our invoice
-
Tax Method: Here we can choose between calculating the tax before or after the discount (if applicable). For more information and an example take a look at the WP-Invoice Main settings tab.
- Trash Invoice: Sends the invoice to the trash. Note that you can retrieve it later (without dumpster-diving) or delete it completely.
- Save: Saves the changes you made in the invoice and creates an entry in the invoice history area (explained below).