Billing with WP Invoice
We already learned how to create and edit an invoice. Where do we go from here? WP-Invoice gives us ways to notify the client, add charges and fees to the invoice, and see the complete history of the invoice (very useful if we are in a multi-user business and more than one person manage billing). Here some of these advanced settings, all available in the invoice edit page.
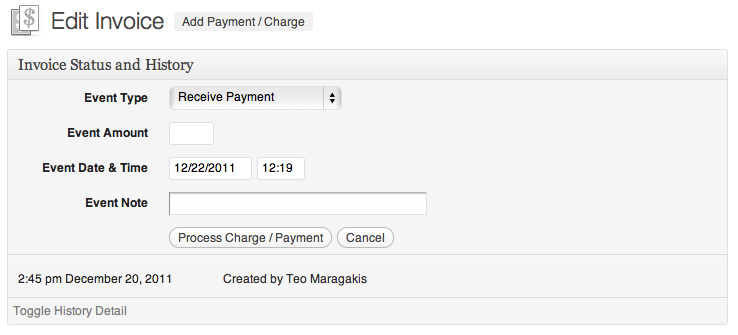
When you click on one of these links, an area with fields to let you control the charge / payment will appear above the Invoice Status and History area:
Event Type: This drop-down allows you to choose what kind of adjustment (event) you will add to the invoice. Your options are:
- Receive Payment: If selected, a payment will credited to the invoice and the client’s total due will decrease.
- Add Charge: It will add a charge to the invoice, as a line item. A charge can have a tax applied, a Charge Tax field will appear on the form if selected. Note that a charge is not a product or service.
- Administrative Adjustment: An positive or negative adjustment to the invoice. Positive values entered in Event Amount will credit the invoice while negatives will add a charge.
- Refund: Put the amount you want to refund your client. Be advised invoice from your site won’t be synchronized with invoice on your payment gateway account. So you will need to do refund there also.
Depending on the event you choose, different fields will appear underneath the Event Type drop-down:
- Event Amount: The amount you will credit or charge. Numbers only.
- Charge Tax: (charge event only) The tax you wish to apply to the added charge.
- Event Date & Time: Date and time you want to set for this event. For example, you might want to use the actual time of a deposit instead of the time that you are making the entry.
- Event Note: A note you will add to the event. If the event is a charge, that note will appear as the charge name, on the invoice’s line items.
After you are done don’t forget to click on the “Process Charge/Payment” button! Events will appear on the Invoice Status and History area too:
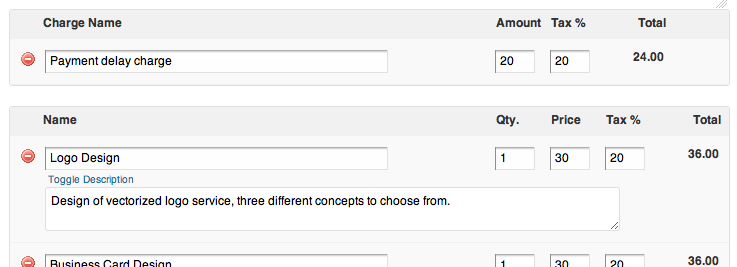
Charges will appear above the line items:
Advanced Publishing Options
After you save the invoice or quote, You will see some more options on the Publish metabox:
- Enter Payment: This will allow you to manually enter a payment (if you have received an offline payment, or for whatever reason you can think of). For more information, take a look at the “Entering Manual Payments” section below.
- Send Notification: This will allow you to manually send a notification to the client that his invoice is ready to be paid. More details on the “Notifications” section below.
Invoice Status and History
After you create a new invoice and save it for the first time, an area will appear right above the Invoice Description (title) field, where a log of all the changes applied to the invoice will appear like so:
By default only the important parts of the invoice history will appear (creation, payments, charges etc). If you want to see the complete list of changes, you can click on the “Toggle History Detail” underneath. You get a more complete view of changes:
Entering Manual Payments and Charges
If you have accepted an offline payment and you would like to enter it manually in the invoice or if you would like to add some charge or make an adjustment, you will find the option to do that in two locations on the invoice edit page: Right next to the “Edit Invoice” header and in the “Publish” metabox on the right sidebar:
Notifications
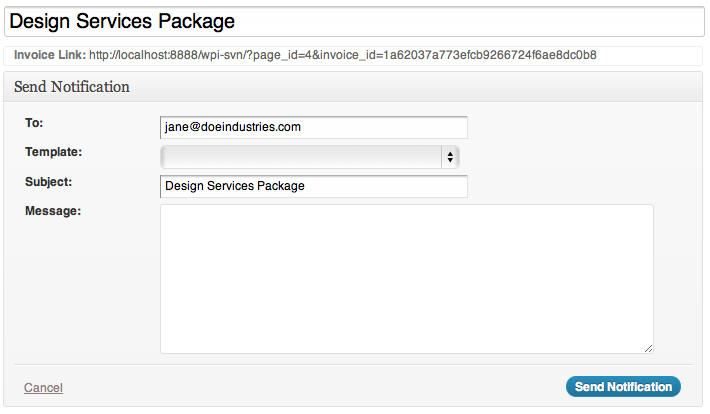
After you have saved an invoice or quote, you can send a notification to the client, letting him know that everything is ready for the payment (can I get an amen?). You should be able to see the notification area appear inside the Invoice Status and History area right after you save it for the first time. If you don’t by clicking on the “Send Notification” link under the “Publish” metabox (shown on a previous section of this article) it will instantly appear.
The fields we see here are the following:
- To: Here, the email we set when creating the invoice appears. We can still send it to any other email by entering it here.
- Template: Here you can choose the template you want for the email notification. The subject and message will change automatically to these of the template we choose.
- Subject: The subject of the notification email.
- Message: Your notification’s message.


